Posts

Showing posts from 2022

Sides of the depot assembled.

Image
Merry Chirstmas! Work continues on the Mopac's Blue Rapid, KS, depot. I've assembled the depot exterior walls and completed the asbestos siding on the ends. All windows are glued in. The bay window piece isn't glued in yet as I want to finish the interior to include the floor and walls. I received another order of styrene from Evergreen so I can work on the exterior corner trim pieces. I still need to install the interior trim around the windows/door and the wainscoting. I'm waiting for temperatures to warm up to allow me to airbrush.   South side of the depot Interior view looking west - awaiting floor, interior walls, and finishing North side of the depot - minus the bay window

Blue Rapids depot progress

Image
  Progress images of the Blue Rapids, KS, depot build. I tackled the north side of the depot along with the bay window. You'll notice the skirting and asbestos siding are lower on the bay than on the side of the depot. The bay window as added in 1911 - 40 years after it was originally built in 1871 (haven't found documentation that it's not the original depot). All the door/windows and the bay are test fit. I still need to build and paint the trim pieces. Once the bay is installed, I will then assemble the four sides of the depot.   Line marks for asbestos siding installation.       Test fit of windows, doors, and the bay   Bay window   Down view of the bay window showing the four laminated sheets of .020 styrene   Interior view of the bay with windows test fit.

Work continues on the Blue Rapids depot build

Image
 Continuation of the Blue Rapids, KS, Missouri Pacific build in O scale (Proto:48). I went back and examined the south side of the prototype depot and it appears that there were a series of windows above the freight room door. Using the entry door as a guide, I scratch built the windows and sill. I've noticed that there are three different style of doors used on the freight room. I'm not sure what was used on the south side and made an educated guess to have it look similar to the north side door. The bay window build proved to be challenging especially trying to laminate three sheets of .020 styrene. I made an educated guess at the size and angle of the bay. I still need to laminate one more sheet for the interior of the depot to the bay.  Test fitting the bay to the depot. I still need to paint the north wall and then I'll attach the bay window. I haven't decided on when to install the asbestos siding. I think I may do it prior to installing the bay. There is a wood t...

P:48 Blue Rapids, KS depot

Image
  I started work on my Proto:48 Blue Rapids, KS, Missouri Pacific depot using a Cricut Maker to cut out the sides with window/door openings. The Circut software has a little bit of a learning curve, but there are a ton of online tutorials to follow and assist with doing just about anything with it. Using modified Tichy Train Group window/doors parts along with various Evergreen styrene parts and BEST 18" asbestos shingles to match the Rail Scale Models Asbestos siding. This is will be next project going forward. I want to model Blue Rapids (maybe Waterville too) circa late 1959/early 1960 time frame in P:48. This will be exciting for me.

Signal is lit and running

Image
Thanks to Dave Oppedisano for developing the program and providing the Elegoo Nano to run the Pueblo block signals. I met Dave at the St. Louis RPM. I was stuck on how to illuminate and operate the signal and after a short discussion, he offered to assist me.  I still need to add additional vegetation to the diorama, but it's nearly complete. As I learn new techniques I'll revisit the diorama and make changes. 

Signal number boards

Image
 I worked with my friend with the 3D printer to try to print the signal number board with raised numbers like the prototype, but the results were not clear enough to read the numbers for my block signal. He suggested to print them out on my home HP printer. I played around with the settings and created the numbers in Word and then imported the file in to Abobe Acrobat Pro to size it to scale. I spray painted a plain piece of paper the same color as the signal and then had to run the paper through the printer about 5-6 times to get the ink dark enough to clearly show. It's not the best printer, but it printed exactly the same spot on the paper each print to darken the letters, but not ghost them. I stick glued it to the signal and I think it turned out really good. Cheaper method then decaling and learned a new skill of painting paper and prints. Hopefully longevity isn't an issue, but if it's is, should be easy to scrap off the metal plate and then decal. It look...

Remembering old techniques

Image
So I am nearly at the point to apply scenery to my diorama. Why the procrastination you ask? It's because I have various scenery products that I used in the past and I'm working to relearn how to apply or use the techniques again. I'm a turtle at modeling at times, but I continue to make forward progress which is the goal.  I decided to trim the track back to where it only covers the ground and not the 8" diorama tube. This way if I want, I can push the scenery disk down in to the tube to give a border. I'll have to move the block signal base holes closer to the track after measuring the prototype. The signals are spaced at 6' 6" and 7' from the rail. One thing I had to fix was the glass insulator color on my line pole. I wasn't happy with it as it appeared too green. I happened to see Tom Johnson's post and he recommended using Metallic Green color so I picked up a spray can of Tamiya color paint. It definitely helped to achieve the color ...

Cricut Maker

Image
 We got a Cricut Maker. My spouse will use it for crafts and T-shirts and I plan to use it to cut styrene to make buildings, scenery details, and possibly freight cars. There are a few that I doubt will ever be produced in RTR or kit form so this will be the method I use to ensure accuracy/consistency for cutting. I joined a Facebook group that specializes in adapting the Cricut for modeling purposes.

Scenery Supplies

Image
 One of the challenging things with moving every few years is all of my modeling supplies stay in boxes. I forgot what I have and then I'll buy duplicates of the same supplies. This can be helpful at scenery time as scenery, specifically static grass will be something I'll use a ton of and having too much is not an issue. The good thing is one point in the past I collected, sifted, and sorted all of the rock, dirt/soil, etc. that I thought I'd need so I'm ready to use it on the diorama.   I used Joe Fugate's method of building a static grass applicator which you can see the Sour Cream container in the top box. IIRC, it's a little shocking. There are several other items I've used in the past and don't recall specifically how or for what and it's great the internet exists as all I have to do is enter the name of the item and scenery and it'll tell me how to apply/use it. I try to add methods to this blog or I write steps in digital files so I can r...

Line Poles

Image
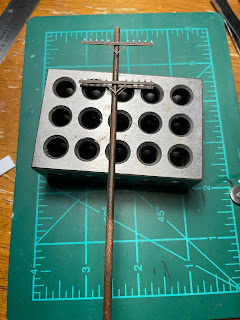
 I started work on the line pole that will feed the block signals. I couldn't remember what the prototype line poles looked like exactly so I looked a few period images to give a rough estimate. This is what I built. Unfortunately I guessed wrong at the insulator colors and luckily I needed to go back and take a few measurements and photos of the prototype, I was able to then try again and make a line pole that is a close representation of the prototype. Prototype images. The Actual line pole that fed the block signal I am building. Not much left of it.  So I traveled to a different signal and used it as an example for my model. This is a line pole next to the line pole that fed the block signal I'm building. You can see the glass insulators on the top arm and then the brown and white ones on the second cross arm. The bottom of the metal brace on the cross arm is only 12 feet off the ground. I used Tamiya Park Green spray paint for the glass insulators and then used Polly Scal...

Weathering track and the line poles

Image
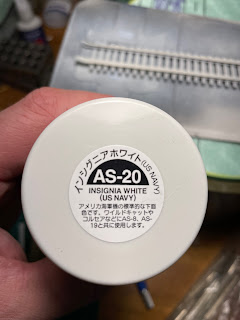
 Next up is the weathering and detailing of the track and the line poles. Because this is a small diorama, I want to try to be as realistic as I can with these details and used Lance Mindheim's track weathering technique. Starting with Micro Engineer code 70 track and Rix Products Railroad Telephone Poles and Cross arms, I first sprayed everything with Tamiya Insignia White (US Navy) spray paint. This provides a base for the weathering. I masked the top of the rails with masking tape. I then used Lance's technique of washes of Burnt Umber oil paint thinned with mineral spirits. Lance says to get the mix the consistency of tea. Initial coat. I decided to go heavier with my burnt umber to model newer ties and line poles. I ended up with four coats of the wash to get to my liking. I then highlighted random ties with Polly Scale Oily Black paint to give the them a new creosote look. I still have to add the insulated joint bars and paint the rail. I did the same with the line pole t...